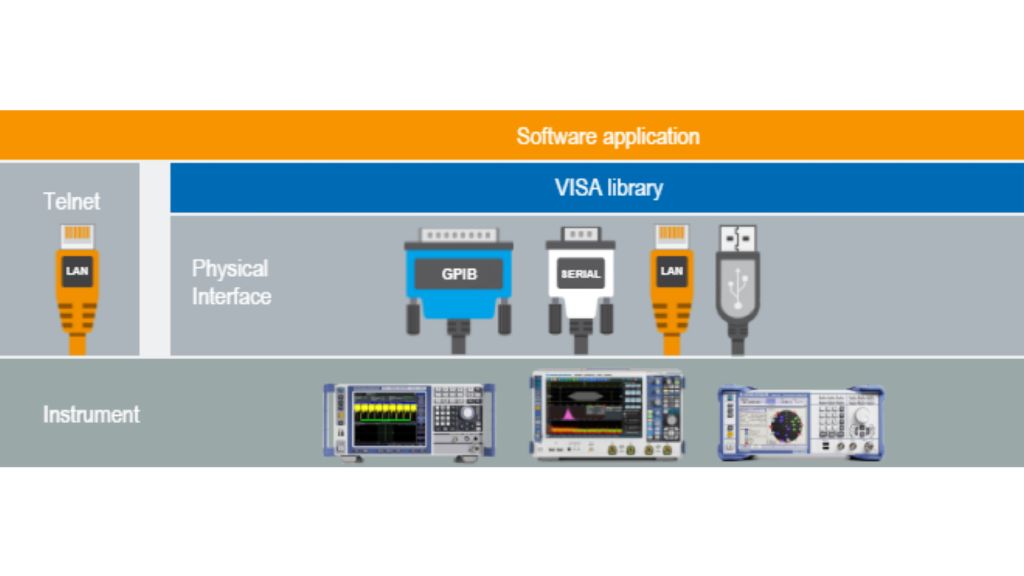
3. VISA and VISA Tools

History

At the time, where GPIB was the main physical communication interface, remote control applications communicated directly with GPIB hardware drivers. Later, the RS-232 serial interface was introduced as a cheaper alternative to GPIB. Here too, applications communicated directly with RS-232 hardware drivers.

The situation got even more complex as LAN interface has become the standard in the computer industry. Test & Measurement instrument vendors have realized the potential LAN interface can bring to the connectivity options for their instruments. However, using a third software interface for the LAN-connected instruments would bring even more incopatibility for the measurement applications.

Out of the motivation to unify the software interface, VXIplug&play Alliance introduced VISA standard (Virtual Instrument Software Architecture). The current maintananer of VISA is IVI Foundation. For the LAN interface, the TCP/IP-based protocol was named VXI-11. Later, came its improved version called HiSLIP (High Speed LAN Instrument Protocol). The last addition was support for the USB interface. The USB class of devices natively supported by VISA are called USB-TMC (Test and Measurement Class).

VISA structure

Below, is a list of the most important VISA functions:

Access and Search functions:

  • VISA Open Default RM ‒ opens a new Resource Manager for all VISA remote connections.
  • VISA Find Resource / Find Next Resource ‒ Find an instrument according given criteria
  • VISA Open / Close ‒ opens and closes remote connection to an instrument.
  • VISA Set / Get Attribute ‒ sets or reads a session attribute.

Input / Output functions:

  • VISA Write ‒ writes a command string to an instrument.
  • VISA Read ‒ reads a response string from an instrument.
  • VISA Clear ‒ clears device input and output buffers.
  • VISA Read STB ‒ reads instrument's status system summary byte called STatus Byte.
CH3_Layers_16x9.png

Above, is a picture showing different software and hardware layers involved in a remote-control communication. The instrument is at the bottom, your application is at the top. The VISA layer shields your application from the specifics of the physical communication interface. One exception where you can bypass VISA is Telnet connection ‒ see *Note1.

R&S VISA

VISA implementations come from different vendors, but they all must abide to the same VISA interface standard. In the following chapters we present VISA and VISA Tools from Rohde & Schwarz and National Instruments.

Advantages of R&S VISA compared to other VISA vendors:

  • Compact size ‒ the installer has only cca 35MB, deployed 45 MB
  • Search for instruments in the network via mDNS and VXI-11
  • Native support for R&S NRP-Zxx powersensors (see *Note5)
  • Available for Windows, Linux, Mac OS

Rohde & Schwarz VISA is available for download here:

1DC02: R&S®VISA description

R&S®VISA Installers

Windows

By downloading R&S®VISA for Windows you are agreeing to be bound by the Terms_and_Conditions_for_Royalty_Free_Software

MAC OS X

By downloading R&S®VISA for MAC OS X you are agreeing to be bound by the Terms_and_Conditions_for_Royalty_Free_Software

Linux

By downloading R&S®VISA for Linux you are agreeing to be bound by the Terms_and_Conditions_for_Royalty_Free_Software

VISA Tester Tools

VISA Tester Tools represent ready-to-use applications that allow connecting to your instrument, sending SCPI commands and reading responses. They provide a complete independent way to verify the communication with your instrument.

Rohde & Schwarz VISA tester tool is called RsVisaTester. You can find it in:

Windows Start Menu -> All Programs -> R&S VISA -> Tester 32bit/64bit

How do you tell VISA which instrument over which interface you want to connect to? All this information is coded into one string called Resource String that you pass to the VISA Open function. If you already know your resource string, you enter it into the Resource field. If not, you can use the menu item Find Resource.

Here are the most typical examples of the Resource Strings:

  • TCPIP0::192.168.2.100::inst0::INSTR ‒ instrument is connected over LAN (VXI-11 protocol), its IP address is 192.168.2.100. The 'TCPIP0' identifies LAN-adapter index, if more than one are available. The part 'inst0' identifies the instance of an instrument in case of more logical instruments share the same IP address (e.g. R&S CMW). You can leave it out and use the shorter form TCPIP::192.168.2.100::INSTR
  • TCPIP0::192.168.2.100::hislip0 ‒ instrument is connected over LAN (HiSLIP protocol), its IP address is 192.168.2.100. Similar to VXI-11, '0' at the end identifies instrument instance. See *Note2.
  • TCPIP0::192.168.2.100::5025::SOCKET ‒ instrument is connected over LAN (RawSocket), its IP address is 192.168.2.100 and the port is 5025
  • GPIB0::20::INSTR ‒ instrument is connected over GPIB interface, its GPIB address is 20. If more GPIB controller cards are available, you distinguish between them with the 'GPIB0', 'GPIB1', 'GPIB2' and so on... See *Note3.
  • ASRL3::INSTR ‒ instrument is connected over serial interface COM3.
  • USB::0x0AAD::0x0119::022019943::INSTR ‒ instrument is connected over USB interface (USB Test and Measurement Class), with Vendor ID 0xAAD, Product ID 0x119, Serial Number 022019943.
  • RSNRP::0x0095::104015::INSTR ‒ Rohde & Schwarz NRP-Zxx, Product ID 0x095 (NRP-Z86), Serial Number 104015 (see *Note5)

Assuming you already have the correct resource string, connect to your instrument by hitting the Connect button. Then, enter the string *IDN?\n into the command field and hit Write + Read, or Query which automatically combines Write + Read operations. For the '\n' character see *Note4. The result is the instrument responding with an identification string:

NI VISA offers the same options with its application NI MAX. In the left Tree-control branch Devices and Interfaces, you can search for your instrument or add a new one. The connection is established when you open VISA Test Panel. The Input/Output tab provides controls similar to the RsVisaTester:

VISA Trace Tools

Another advantage of using VISA is the ability to trace and log the entire communication with your instrument. The log contains information about every action you performed over VISA ‒ every command you sent, every message you received from an instrument, plus timestamps of those actions and errors if they occur. You can analyze this log for errors, performance issuses or other problems you might be facing. If you cannot resolve the problem yourself, you can save the communication log into a file and send it to a colleague or to one of our experts in Rohde & Schwarz Customer Support. Our instrument driver plugin for LabVIEW allows for importing IO trace and quickly convert it into LabVIEW code (see Tip 2.1 in 1MA228).

Rohde & Schwarz VISA IO trace utility is called RsVisaTraceTool. You can find it in Windows Start Menu -> All Programs -> R&S VISA -> Trace Tool. Detailed description is available in the R&S VISA Manual placed in the same folder. RsVisaTraceTool logging the *IDN? query communication:

NI VISA trace tool is called NI IO Trace. You can find it in Windows Start Menu -> All Programs -> National Instruments -> NI IO Trace. NI IO Trace logging the *IDN? query communication contains more entries due to reading of several session attributes:

*Note1 - Telnet and RawSocket connection

Rohde & Schwarz instruments support Telnet (Teletype Network) protocol for the cases where VISA cannot be used (very often on LINUX or embedded systems) or may not be used (e.g. A&D industry). If an instrument supports Telnet protocol for remote control, you can still use VISA to communicate with it. In that case, the connection is called RawSocket.

*Note2 - HiSLIP protocol

The HiSLIP is explained in more detail in the application note 1MA208: Fast Remote Instrument Control with HiSLIP, including list of the Rohde & Schwarz instruments supporting the HiSLIP protocol.

*Note3 - GPIB interface and R&S VISA

The vendor of your GPIB controller (PCI / PCIe / USB-GPIB) must match the VISA provider. If for example, you use NI GPIB controller, you have to use the NI VISA.

*Note4 - Termination Character '\n'

'\n' is a Linefeed (LF) termination character, hexadecimally represented as 0x0A. It serves as message termination character.

In case of RawSocket and Serial connection, for VISA Write operations you always have to terminate strings with the LF character, because that is the only way to tell the instrument that message has ended. To recognise the end of the response in VISA Read operations, you need to set the VISA attributes VI_ATTR_TERMCHAR_EN to TRUE and VI_ATTR_TERMCHAR to 0x0A. Otherwise, although VISA Read receives correct response, it finishes with timeout error since it still expects more bytes to arrive.

Some instruments require the LF regardless of the connection type. In any case, sending the message with the LF at the end is the most universal and always works properly.

According the SCPI standard, instruments must terminate responses with LF. In our example above, notice the LF at the end of the identification string response in the NI Visa Test Panel. RsVisaTester does not display white characters, but you can see them in the RsVisaTraceTool log.

*Note5 - R&S NRP-Zxx support

Starting from Version 5.11.0, R&S VISA for Windows supports the previous generation of R&S powersensors NRP-Zxx. To enable this functionality, you need to install the R&S NRP Toolkit 4.17 or newer for Windows.

As the resource string, you can use two different variants which are interchangeable:

  • RSNRP::0x0095::104015::INSTR - Rohde & Schwarz NRP-Zxx, Product ID 0x095 (NRP-Z86), Serial Number 104015
  • USB::0x0AAD::0x0095::104015::INSTR - Vendor ID 0x0AAD (Rohde & Schwarz) Product ID 0x095 (NRP-Z86), Serial Number 104015

Tip: If you do not know the PID of your powersensor(s), connect them to your computer, and perform the Find Resource on the R&S Visa Tester. Then you either use the desired resource string from the list, or in case you have more then one powersensor connected, you can pair the Product ID with the serial number printed on the powersensor label above its bar code.

Request information

Do you have questions or need additional information? Simply fill out this form and we will get right back to you.

Marketing permission

Your request has been sent successfully. We will contact you shortly.
An error is occurred, please try it again later.